Back to Facility Schedule Main Menu
Once a schedule request is entered by a Requester, it follows the Automatic Approval Routing to take it through the approval process. When a request is assigned to you for approval, it will show up on your Facility Schedule home page under the Waiting Your Approval section. You may also receive an email notification that you have a request waiting to be processed.
There may be several approval steps at your organization or you may be the only approval person. The way you process your requests will depend on where you are in the approval chain.
How to Process a Schedule Request
-
Log directly into Facility Schedule and click on the number displayed under Waiting Your Approval on your home page. You can also access the processing screen by clicking on the link provided in the email notification, which (after logging into the system) will take you directly to the Approve Schedule Request screen.
-
Select the Schedule title from the drop down menu.
-
Choose the appropriate option to process the request: Process/Approve Now, Cancel, Decline, or Duplicate.
-
You may see a Conflicts Exist warning on the approval page or on the Schedule itself. See How to Resolve Conflicts for more information.
Approving and/or Activating a Request
-
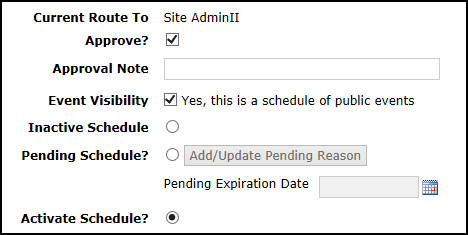
Click on Process/Approve Now.
-
Scroll down the page to review the schedule details. Check the box next to Approve?*Note: ONLY select Activate Schedule if you are the final approval person.
-
Click Save to update.

*Note: If you are the only person in the approval process, you will want to make sure to select Approved from the Status drop down box at the top of the schedule request form before scrolling down to activate the schedule. This will check the boxes to send email notifications to the Booked By and Contact Person to make them aware that their schedule request has been approved and activated.

From the schedule form, quickly access other schedules that need approval by hovering your mouse over the Related Links button, and then clicking on Process New. This will take you to the Approve Schedule Requests screen, where you can select another request to approve.
From the activation confirmation page, access the approval queue by hovering your mouse over the Shortcuts button, and then selecting Approve Schedule Requests.
Declining a Request
-
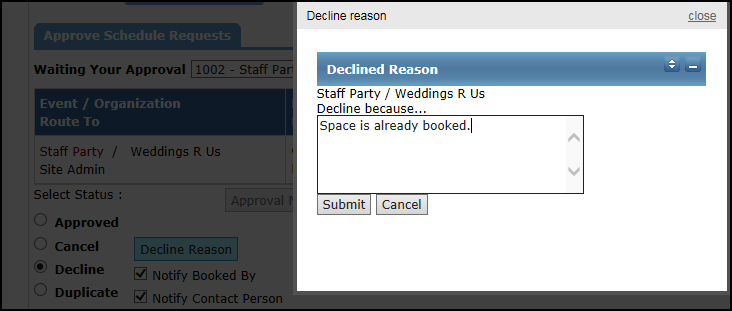
Select the Decline option.
-
You can add a note explaining the reason for declining the schedule by clicking the Decline Reason button. The Decline Reason can be sent to the Booked By person and Organization Contact on the schedule. (You can uncheck the boxes next to "Notify Booked By" or "Notify Contact Person" to prevent the email from generating.) Click Submit to save your note.
-
Click Save to update the schedule.

